

Wax dipping woodenware for preservation and disease management
This page contains info on why I use wax dipping, information for customers who want to have their equipment wax dipped, and instructions and tips to make your own system.
Plans for 2026 wax dipping - I plan to dip boxes this late summer/ early fall. Please sign up for the newsletter to get actual dates, or scroll to the bottom of this page for other beekeepers in Michigan who perform wax dipping.
Why I decided to switch from painting to wax dipping.
Me and my beekeeping operation are very limited by both space and time, so painting woodenware was a major pain and a logistical bottleneck. Wax dipping does not require the same space and time for drying as paint does, and wax-dipped woodenware should last much longer than paint or stain. Even better, the hot temperature of the wax can sterilize equipment - including killing AFB spores, and is a recommended method for dealing with disease risk. This process is used a lot in Australia and New Zealand, who have great resources on this process. Click on the links below to read more:
Here is a fact sheet from the New Zealand Government on the process.
Hot wax dipping of behive compoents for preservation and sterilisation - Australia Fact Sheet
Sterilising Equipment contaminated with American Foulbrood spores - Mark Goodwin, Apicultural Research Unit, New Zealand
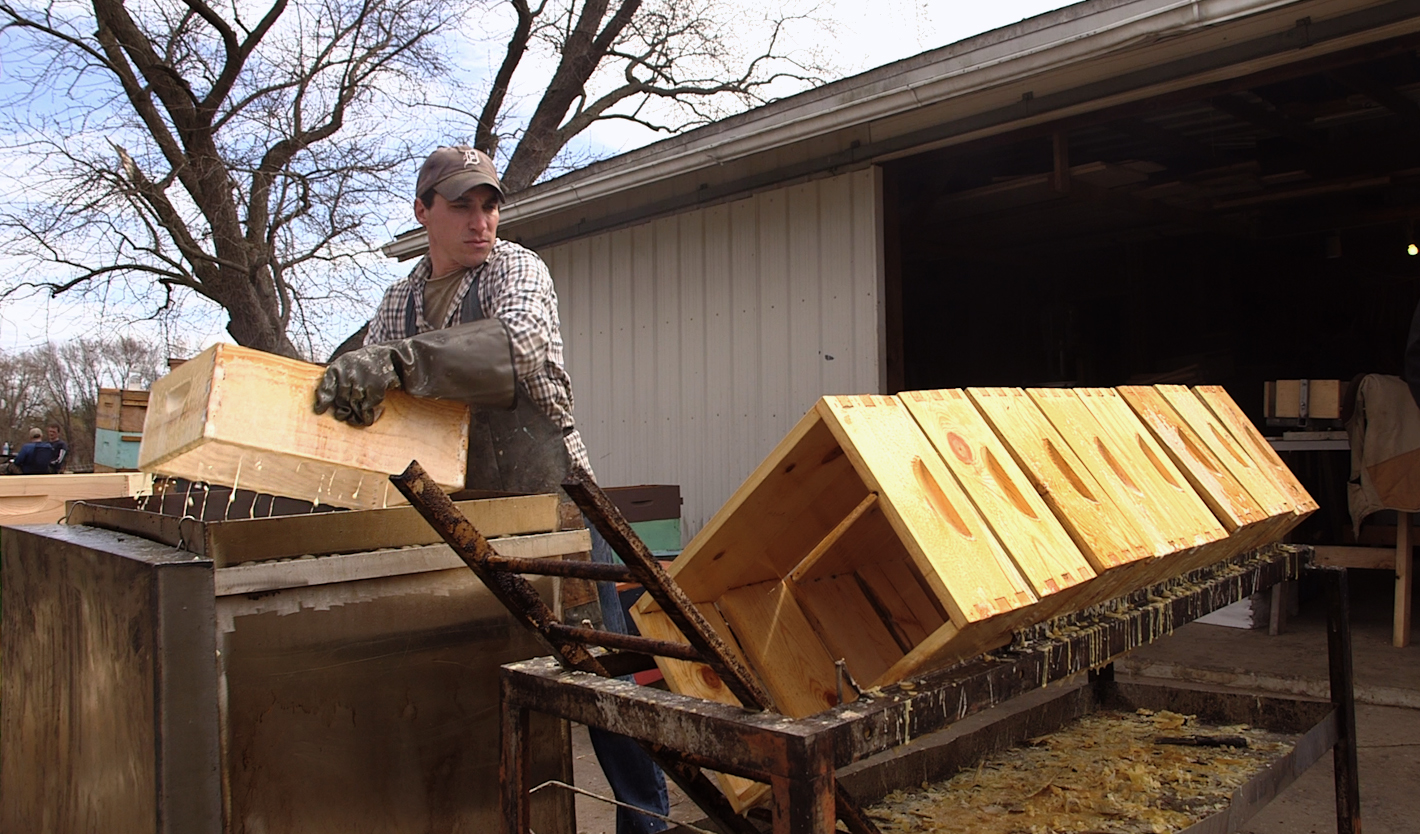
In 2016 we made our own tank, welded out of scrap stainless steel (dimesnsions and more info on the bottom of this page). I use 2:1 paraffin wax to microcrystalline wax. The wax is heated to 160 Celsius (320 Fahrenheit), and the boxes are submerged for 10 minutes. The water within the boxes boils out, and it is replaced with wax. The boxes cool / dry within minutes, and are waterproof and are ready to go. According to others who use this process, the woodenware and should last for decades (I've only been using it a few years, so time will tell). The melter contains about 700 lbs of wax, so it takes a really long time to melt. For this reason, I only fire it up a few times each year - I like to have at least 60 boxes ready to dip before it is worth it to use. Usually I’ll dip my equipment one day, and other beekeepers’ the next day. You can see in the photo that I have a stack of (my) clean, used boxes on pallets ready to be dipped, as well as a stack of unpainted / unassembled equipment from other beekeepers ready to go.


In the close up, you can see the foam created from moisture in the wood. It is really important to only do this on dry wood, and to do it on a nice weekend (I always do it outdoors on the cement pad in my driveway for safety). If there is too much moisture, the tank can boil over. You can also see that I use a weight to keep the boxes below the wax. The two boxes at the top will be flipped over so that the exposed side (above the wax line) will also get dipped. This tank holds 6 deeps at a time when it is full, but will hold less after a long weekend if I don’t top it off with more wax.
Frequently Asked Questions
When is the next wax dipping date?
If I do decide to host one in 2026, I’ll send out the info to my mailing list, or coordinate with local clubs. Please make sure you are signed up for my mailing list (bottom of the page) if you are interested in being made aware of wax dipping dates.
How much does it cost?
I ask for $5 / piece (box or lid, bottom board, etc). This does not cover any labor, but does cover my material costs (propane and wax). Usually my labor is covered by great beekeeper conversation, good company, and snacks.
Can I dip used equipment?
Yes you can dip used equipment - as long as it is clean and dry. You’ll want to make sure to remove all dirt, dust, dead bees, cobwebs etc. Use a stiff brush or rag to remove all debris, as there is no way for me to get it out of the bottom of the tank if it goes in. I am very serious about biosecurity, and the tank is one of the tools that I used to minimize risk of disease, as the heat of the wax is hot enough to kill most pathogens, including AFB spores. However, the burn pile is also a very important tool for biosecurity, so please don’t bring anything highly suspect or too rotten.
Can the equipment be painted?
Yes. Most of the time existing paint is just fine, though I have had a few colors fade in the melter (an orange turned to light yellow). You can also paint the boxes immediately after dipping (before they cool), if you want them painted a particular color. You'll have to do that yourself, but we can set you up with a tarp and water to clean up after yourself. As the boxes come out of the dipper, you can paint them while they are hot.
Does the equipment have to be assembled?
No, you can also dip unassembled boxes and woodenware. The wax goes into the wood, so it doesn't change the size of anything.
Can I dip metal parts like screened bottom boards and telescoping covers?
You can, but the wax will cling to the metal. It may fill in some of the holes on screened bottom boards (unless you immediately wipe it), and it will dull the shine on the lid. It will work fine, but you may not like the way it looks.
Is there anything that can’t be dipped?
You don’t need to things that aren’t exposed to elements like frames and inner covers. I have had mixed results with thing like plywood, and wouldn’t recommend dipping pieces that have thin plywood, masonite, particle board, etc.
Why don't you use beeswax?
Beeswax melts at too low of a temperature. If I use beeswax the boxes will get all sticky in the heat of the sun, and the dirt will stick to them. The paraffin/ microcrystilline mix is designed to remain hard in the summer heat, and will actually impregnate the wood. It also means that I can heat it up to a temperature that will kill pathogens.
How long does it take?
It depends on how many people show up, how warm it is outside, and how wet the wood is. Each round takes 15 minutes, and I can do about 6 deep Langstroth boxes at a time. After they come out of the melter, it takes only about a minute for them to cool and dry, and they are ready to go. If there is a lot of moisture in the wood, the wax will cool (as the water boils out), so I may have to stop after a few rounds and let it heat up for 20 minutes or so.
Do I have to be there the whole time?
No, you don't, you can drop off boxes, and I can call you when they are done. You are also more than welcome to hang out, talk bees, or even make frames (mine or yours!) the wood shop while you wait. I don't take appointments, and we are at the mercy of the weather and the wood moisture, and other beekeepers, so I can't guarantee that I can your boxes immediately when you arrive. If you drop off equipment, EVERY piece of equipment must be labeled with your name, and you must leave a note, text, or email with an inventory and your phone number. A sharpie or even pencil will work just fine for marking boxes. I will leave a pallet by the driveway, and you can leave your equipment there, and pick it up after the weekend is over and it is done. You are welcome to leave them in my yard for a few days even, if you can’t pick them up right away.
Do I need to organize with you or schedule an appointment?
It is good to check your email or give me a call before you drive out to make sure it is still happening. We have had to switch weekends before because of pouring rain or heavy wind. If it is bad, you can always just leave the equipment, and I'll do it when the weather turns and I have time.
Let me know if you have more questions! sandhillbees@gmail.com / 651-428-0543
This video is obviously not of me, but the process is very similar.
Wax dipping tank specs
Below is more information on how to build wax dipping set up, if you want to build your own. It has drawings and diagrams from another beekeeper, plus my notes on how it was modified for my operation. The beekeeper who sent me the drawings put about $3000 to have this custom made, plus another $1300 for wax. I had “free” labor, and we were able to find stainless scrap pretty cheap so we have less into the the materials, but have the same amount of money in for wax at least.

My tank does not have a connected heat shield and was made with heavy duty castors rather than openings for pallet jack for movement.

The boxes will float in the wax, so you’ll need something to hold them down. This is a fancy version - with a spring catch. I used a homemade ‘ladder’ out of rebar and scraps, that I put a cinder block on for weight. It does involve getting pretty close to the wax, so I wear a full front apron, and elbow high safety gloves (rubber with a high temp insulation).
This is from the beekeeper who sent me the diagrams, but my experience is basically the same- “Inside tank dimension are 36" x 24" by 34" depth, and it sits 8" above the ground on a steel base, so total overall height it 42". It has a heat shield around the inner tank that sits out about 2 inches. As it is, we stand on a pallet so that we can get stuff in and out of it easier without having to reach in too much. With this tank I can do 10 mediums at a time or 6 deeps. I wouldn't make it any deeper, I think ours is just right. The interior of the tank is made entirely of stainless steel. The bottom plate is 1/4inch and the sides are 11 gauge. We then have a 16 gauge galvanized heat shield around the whole thing so that we don't burn ourselves and a 16 gauge lid that we place on it when we're done to keep dust and debris out of it.”
My propane burner has been upgraded twice. First, we made one using a 0-20PSI adjustable regulator, 3/4 black pipe, and a gas/air mixer, HPGX-1, from http://www.tejassmokers.com My initial burner was just 1 pipe with 5/32 holes drilled every half inch. This did not put out enough heat and took 10 hours to melt all the wax and get it up to 250. I then modified this and made it 3 burner pipes. It only took 6 hours to heat it from a solid block up to 270. On our first day of dipping I fired up the burner at 8am and we were dipping by 2pm. The next day all the wax was still pretty liquid with just a 1 inch skin on top, it only took 2 hours to heat it back up to 270. In 2025, after 9 years of storage and use, the holes in the black pipe had rusted out, so the flame was not as tight. I removed all the installed burners, and bought 3 single propane burners from amazon and added some custom-height legs. These ended up working waaaay better than any of the black pipe versions - so much so I generally move to 1 or 2 burners after it is melted, and can keep the heat just fine.
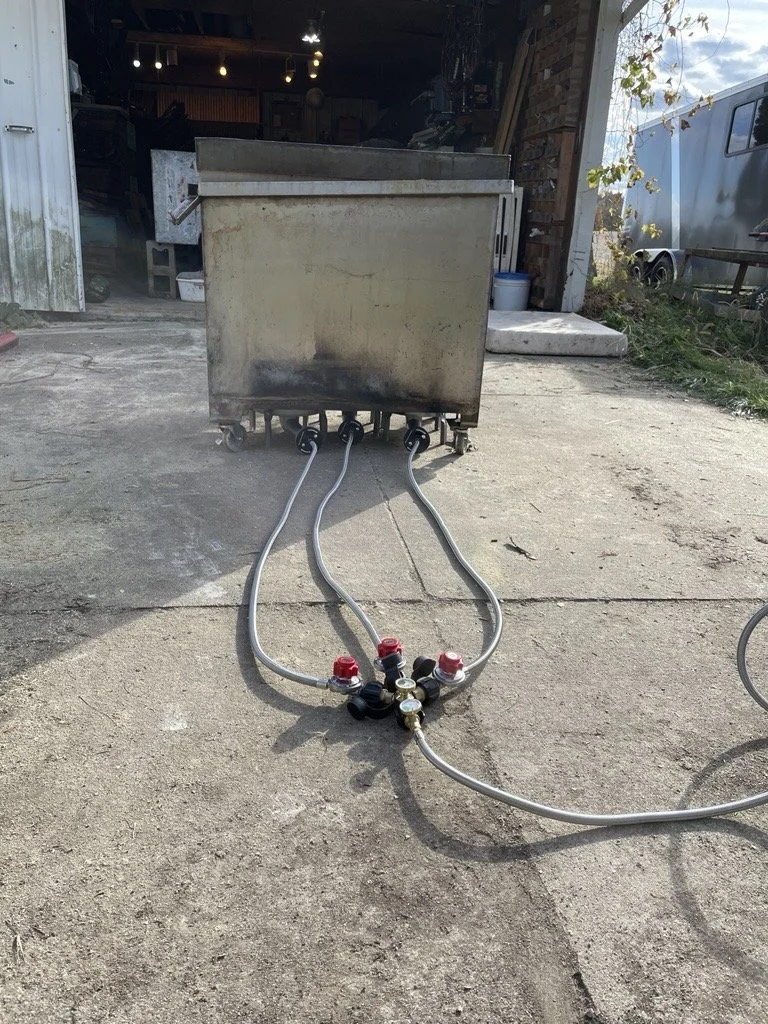
The modified set up in 2025 - The three way splitter allows me to use all the burners on cold days, and only 1 to maintain heat on hot days. I use a 100lb propane tank.
My tank has a lid so that I can use it as a working surface most of the year when it is my garage (and to keep the wax clean and to throw on in case of fire). The lid hangs off the side of the tank on S-hooks. I also have a 2” over flow rim that goes around the tank and empties into a bucket. If I were to do this again, I would make the overflow rim huge, and have it drain into my drying rack (or a larger container). The few times we have had it overflow (from overfilling with equipment that isn’t totally dry), it was pretty dramatic, and the little rim/ bucket was not sufficient). My driveway is nicely sealed though….
More notes from my experience
The tank doesn’t clean very easily, so we made a metal skimmer for the tank to get any floating debris (grass, dead bees, etc). I don’t have a solution for removing the dirt and small items that sink to the bottom. That isn’t built into these plans, and I would really like to hear from others that have a solution/idea for this. I did add a few bars of angle iron to the bottom to keep the boxes up off the bottom for both burn risk and to keep it out of any sunken debris.
Because I have done painted boxes and old boxes, the wax has darkened a bit, but I don’t mind the color change. If there is dirt, it can stick to the boxes, and they are perfectly fine, but don’t always look “clean” - which I tell other people who are getting brand new equipment dipped. I haven’t met anyone yet who has cared about this, and most people like the natural look.
In 2019 I switched to a 100 lb propane tank. I was using 20lb tanks previously, and I had to watch them closely. They freeze, so were constantly switching them out, or tipping them over, or thumping them to loosen frozen valves. I would recommend a bigger tank or at least 4 small ones - we had only two, and usually ran to the gas station for a refill at least once per day.
It takes hours to melt the wax block (which translates into at least a full 20lb tank of propane), so I try to have enough woodenware on hand to have it going for at least two days. I’ll stop when it gets too cool (which usually coincides with me being too tired). If it is warm, I’ll shut it off, and restart it early the next day. If it is cool, I’ll leave it on low overnight.
There is a huge fire risk, and we’ve had one boil-over (someone accidentally spilled some water into the tank causing the tank to bubble and overflow). I put ours on castors so we can do it on the cement pad in front of the garage. I always have a fire extinguisher handy, and watch what is near the burners.
It really isn’t worth it to do if the tank gets low on wax. The wax is super expensive, but having it full means I can do 6 deep boxes at a time (compared to 4), which really makes a difference when you are doing a lot of equipment. When the tank gets low, and I can only do a few boxes at a time, the process can take forever.

My tank is not insulated, so it isn’t very efficient in cold weather. I have tried wrapping it with rock wool (held with Hardi-board fiber cement and ratchet straps). It looks really trashy, but it makes a big difference on my ability to bring it up to temp, and to keep it going all day. Pro tip: before you insulate the tank to the ground you should note if your casters are metal or plastic. If they are plastic, they will melt, and you’ll have to figure out how to move a 700lb tank that has fused to your driveway. In 2025 I also added a wind / heat shield - just a stainless wall between me and the tank. It is much nicer for the user and also helps for keeping it warm on windy days.
Other tools you will need
Tank - see above
Propane - I use a 100 lb tank, and a small 20lb tank if I need to run to get it refilled
Wax - See below
Thermometer - I have both an old school glass thermometer and an infared thermometer
Gloves - I use heavily insulated, long cuff rubber gloves, like those used for handling dry ice or duck hunting. They get pretty gross, so I buy a new pair about yearly.
Apron - The boxes drip, so I made a heavy duty denim apron (you can see gloves and apron in the top of this page. Your boots will also get artistically wax sealed so wear something closed toe that you don’t care about.
Hay hook - It is nice to have something to haul the boxes out besides your hands. I found a hay hook works great.
Cinder blocks - we use these to weigh down the rebar ‘ladder’ that keeps the boxes from floating
A drying rack - I have a old rack from uncapping honey, but anything where the boxes can drip dry
Paint scraper - when the wax is a little cold, or the weather is really cold, the wax can cool on the boxes (when everything is warm, it is all inside). We use a stiff 4” dry wall taping knife to scrape excess wax off the boxes so it can be put back in the tank.
Where to get wax
I do not have an inside scoop on the cheapest / best place for wax. This means I don’t have a recommendation, and I would love to hear from people who find good places. In the past I have purchased from Aztec Wholesale Candle and IGI wax from Holland Chemical. I have had beekeepers recommend this site: https://blendedwaxes.com/product/beehive-wax/ as well as this site: http://www.canadawax.com/hiveguard.html. My main consideration for wax has been melting point, price, and shipping - you have to consider if you can unload freight, or if you need a lift gate, and that it will be very heavy (expensive and difficult to ship/unload).
I use the 2:1 paraffin : Microcrystalline ratio because most of the other sites that I read recommend this. I would love to hear if anyone has some evidence/ facts/ studies/ on what is best to use, or even has strong opinions on this.
Let me know if you have questions about this system - I really like it, and am happy to share my experience!
Other beekeepers in Michigan who wax dip boxes:
Dave Rex
Rex Apiary
248 660 9158
10340 Parshall Rd. Fenton, MI 48430
Christopher Near
Near Orchards LLC
1893 W Shelby Rd, Shelby MI 49455
m 231-343-8842
Damon Rogers
16861 Waterloo Rd. Lyndon Twp
waxdipmi@gmail.com
517-902-1811 / 734-478-6790